How to Apply a Carbon Wrap: Step-by-Step Guide

What if you could switch your car’s look in one afternoon, no paint, no mess? Carbon wrapping is rising fast for a simple reason: it gives a sharp carbon weave style and light protection at a smart cost. A carbon wrap is a carbon-look vinyl film that bonds to clean paint. It suits mirrors, hoods, roofs, and trim. But here’s the catch. One rushed step can twist the weave, trap bubbles, or leave edges lifting days later. The difference between “wow” and “why did I try this?” is in the small details.
This guide shows how to apply a carbon wrap the right way. We’ll prep the panel, align the film, smooth it with a squeegee, shape with careful heat, and lock it in with post-heat. You’ll also learn when PPF is the smarter choice. Ready? Let’s get that crisp finish.
What Is a Carbon Wrap?
A carbon wrap is a carbon-look vinyl film. It copies the weave style of carbon fiber. You place it on a clean panel to change the look fast. It fits mirrors, hoods, roofs, spoilers, and interior trims. You can wrap full panels or small accents.
Why use it? Style and customization at a fair cost. You can remove it later without repainting. It also adds light surface protection against scuffs. But remember, vinyl is thin. It is not armor.
PPF vs vinyl wrap: PPF is a thicker urethane film built for impact and scratch resistance. Many PPFs have self-healing top coats that repair light marks with heat or sunlight. Vinyl wrap is mainly for look and branding. If you want chip resistance and long service life, pick PPF, then explore our paint protection films to choose coverage for high-strike areas or full-body protection. If you want color or texture change, pick vinyl.
Tools and Preparation
You will need:
- Squeegee with a soft sleeve
- Heat gun
- Sharp knife or precision cutter
- Wrap gloves
- Microfiber cloths
- Isopropyl alcohol (IPA) and a silicone-free surface cleaner
- Masking or knifeless tape (for clean edges)
Prep matters most. Wash the area well. Remove tar, bugs, and old wax. Clay if needed. Dry fully. Then degrease with IPA to remove any film of oil or silicone. Small chips or deep scratches can print through, so fix them first. Aim for a dust-free, indoor bay with steady temps around 16–27°C (60–80°F). This range helps the adhesive work and the film move without tearing.
Tip: Keep the vehicle warm after install. It helps the bond in curves and edges.
Step-by-Step Application Process
This vehicle vinyl application process fits mirrors, hoods, and trims. Work slow. Keep tension even. Use heat only when needed.
1) Measure and cut with margin
Measure the panel and add 3–5 cm extra on all sides. That margin gives you room to stretch and trim cleanly later.
2) Position and align
Peel 10–20 cm of liner from one edge. Tack the film in place using light pressure. Check straight lines and weave direction. If you see a skew, lift gently and realign. Most wraps allow repositioning before firm pressure.
3) Squeegee from the center out
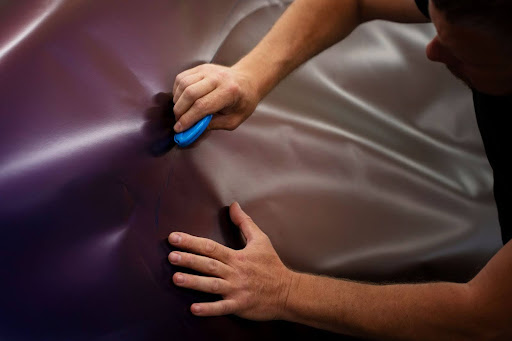
Lock a small “anchor” section. Then work center-to-edge in overlapping strokes. Keep the squeegee angle low. This pushes air to the side and avoids creases. If a bubble forms, lift back a few centimeters, warm lightly, and re-squeegee with even strokes. Consistent, overlapping pressure is key.
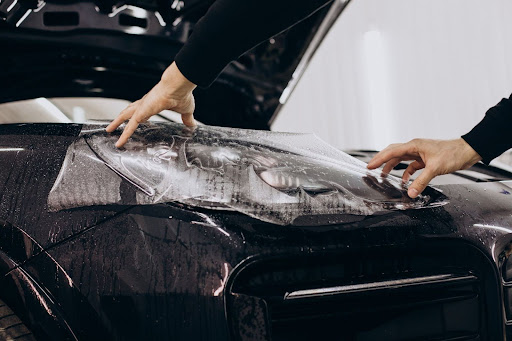
4) Use heat for curves and edges
For gentle bends, minimal heat helps the film relax. Keep the film warm, not soft. For tight curves, channels, or mirror edges, add more heat and stretch evenly with a glove. Do not yank one spot. Uneven pull causes texture distortion on carbon patterns. During initial conforming, many makers advise keeping film temperatures roughly 50–65°C (122–149°F) to avoid damage while shaping.
Pro tip: Work the deepest part of a recess first, then the sides, then the middle area. This spreads the stretch and keeps tension balanced.
5) Trim and finish
Once the film sits flat with no tension at the edge, trim with a fresh blade. Keep the blade low and cut on the film, not on paint gaps. Tuck and seal the edge with your squeegee or a felt tool. Re-squeegee all seams.
6) Post-heat the stretched zones
Post-heating “breaks” the film’s memory in high-stretch areas. This step stops lift-back later. Heat only the stretched sections (edges, corners, channels). Common pro guidance targets about 93–107°C (200–225°F) for post-heat. Use an IR thermometer to read film surface temp. Re-roll or re-squeegee those areas while hot to lock the bond. Always follow your film maker’s spec.
Finishing and Maintenance Tips
- Cure time: Keep the car indoors and above 16°C (60°F) for at least 12 hours after install. This helps the adhesive set on curves and edges.
- First wash: Wait at least 72 hours before any wash. If you must use a car wash later, choose touchless only. Hand wash is best. Avoid harsh brushes and high-pressure water on edges.
- Routine care: Rinse off dust first. Then wash with mild soap and soft microfiber. Do not use abrasive pads. Wipe fuel spills and bird droppings as soon as you can. This keeps the film clean and bright.
- When to choose PPF instead: If you drive long highway miles or face frequent stone chips, PPF is the better call. It is thicker, resists impact, and many films self-heal fine swirls with heat. You can also pair a carbon wrap on accents with PPF on the front end for durability.
To understand how protective films prevent surface damage and enhance longevity, explore our solution for scratches on your car for a closer look at paint protection film in action.
Conclusion
Want that carbon look to last past the first wash? You now know how to apply a carbon wrap. Prep the panel. Align the film. Squeegee in short strokes. Warm and shape with care. Post-heat the edges. Let it cure. Clean it gently. Patience wins here. Small moves. Tight results.
If you want stronger defense against chips and UV, pair the wrap with PPF or go full PPF on high-impact zones. For next steps and clear how-tos, explore Protector’s detailing guides. Your build, your call. We’re ready to help.